Push Your Right Foot In, Put Your Left Hand Down
Crosswind landing techniques
March 2016
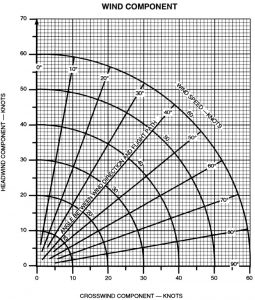
Technically speaking, you are 34 times more likely to have a crosswind landing than not. That number may sound like it was derived from a complex formula, but it’s quite simple. For example, if you are landing on a runway configured as 36/18, the prevailing winds would have to be coming from either 360 or 180 for it not to be a crosswind runway. This leaves you with 34 other directions the wind could come from. Admittedly this is a funny way of looking at it, but the point being driven here is that the majority of your landings will be done with a crosswind (assuming there is any wind at all of course).
Crosswind landings can be a difficult challenge even for the most skilled of pilots. There are multiple reasons for this and a major one is that winds change. What was reported on ATIS, what tower provides during a “wind check”, where the wind reading is being taken compared to where you are landing, what the windsock is showing….you get the point. The reality is we can only take wind observations as a heads up for what to expect. Once we approach the last 200-100 feet above the runway we truly need to make the best use of the visual references outside.
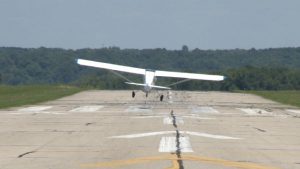
Without recreating the entire Airplane Flying Handbook on crosswind landings, a brief refresher on crosswind landing methods might be appropriate at this point. The two common techniques are a crabbing approach to a landing and the sideslip approach to a landing. Both of which are different up until the end where the same control inputs are made while in the flare: ailerons into the wind and opposite rudder. The end goal is to land with the aircraft’s longitudinal axis in line with the runway and with minimal side drift. Simple concept to understand, but the struggle is real. The third component is to emphasize focusing your eyes outside and more specifically the opposite end of the runway. By looking towards the opposite end of the runway you are allowing your eyes to perform two tasks. First, you begin to see the full extent of the runway centerline. This helps in determining if the nose of the airplane is in line with the runway. Second, the runway centerline and runway edges are now in your peripheral vision which detects movement much better than your center of focus. Any lateral drift is now easily sensed and can be corrected with ailerons. This focusing technique takes practice and sometimes can feel like the Magic Eye 3D posters that were so frustratingly popular in the 1990s.
Keep in mind this sight picture changes depending on what model plane you are flying and whether or not you are in the left or right seat. A center post versus a wrap around canopy can create a much different view. Even a sloping glareshield can take an adverse effect on your sight picture. Dialing it in is most easily done when stationary prior to takeoff. Take note of how the runway markings look in relation to the edges of your windscreen.
 Lastly and arguably most importantly, keep flying the plane until you have stopped! A perfect crosswind touchdown cannot be celebrated until after the plane has taxied off the runway (and in some cases it shouldn’t be celebrated until you’re in the chocks and tie-downs). Once you’ve put the upwind wheel on the runway, keep working those control inputs. As you slow to a stop you need to continue to roll your ailerons into the wind and maintain directional control with rudder and nosewheel steering if you have it. Your airspeed may not be enough to get you airborne, but the wing is still producing lift and that lift can steer you off the preferred surface and into an embarrassing spot on the airport.
In closing, get out there and practice! Test your limits with a capable pilot or instructor on board who can help guide you to crosswind landing greatness. You will soon become more confident and certainly more capable in crosswinds.